
Part 2 - Documentation
2.1 HOME VIEW

When you first start Report Runner Batch, this is the menu and enabled buttons you will see.
- New - Create a new batch.
- Open - Open an existing batch (an .XML file).
- Scheduler - When no batch is opened, the Scheduler interface will show you ALL schedules. Once you open a batch, by default the Scheduler interface will only show you schedules for that batch.
- Settings - Configure global options.
You can only open and work with one batch at a time. You can launch another copy of Report Runner Batch if you need to edit more than one batch at the same time.

Once a new batch is created or an existing batch is opened, the other buttons are enabled.
- Close - Close the currently opened batch.
- Add - Add a job (a report) to a batch and configure a single task to do with it. A batch can be one job or any number of jobs.
- Edit - Edit a job, a previous report and task you configured.
- Delete - Delete selected job (report ) from batch (group of reports). If you delete the last job in a batch, the batch will be deleted as well.
- Save - Save the current batch.
- Run - Run all of the jobs/reports in the currently opened batch.
- INI Settings - Create batch-specific settings to add additional configurations to a batch (there is a TON of options here that won't be obvious out-of-the-box.)
- Mail Header - If the batch is sending an email, you can configure the top of the mail here.
- Mail Footer - If the batch is sending an email, you can configure the bottom of the mail here.
Note: A file attachment list is included between the header and footer of the mail body by default. This list can be suppressed if you do not want to see it.
Quick-Start - "TLDR" of How To Create a Batch Job and Run It:
The primary goal of anyone using Report Runner Batch is to automate a report. We refer to the automation of a report as a "job".
Most users want to automate more than one report, so we allow for grouping multiple reports (or jobs) to run at one time. We refer to the automation of multiple reports (or jobs) as a "batch" (that's where we got the name "Report Runner Batch").
The basic steps to automate a report are pretty simple:
- Start Report Runner Batch
- Click New to create a new batch
- From the New Batch Assistant, select the default option of "Normal" batch (we will cover the other options later)
- This will open the job (report) edit window where you configure (almost) all of your settings
- Choose your report (your Crystal RPT file to use), the output type (print, email, FTP, etc) and the output file format (PDF, XLS, XLSX, CSV, etc)
- Does your report require an ID or password to run the report? You can set that in the Login area.
- If your report has parameters, the Parameter button will be enabled (click it to set your parameters)
- Once configured, click OK to save the job settings
- Click Save on main menu to save your batch (settings are saved in XML file format - we will discuss this file format a bit later, too)
- Click Run to run your "batch" with one job.
That's it! That's the quick basics. Now, if you want to automate more than one report, click the Add Job button. This will add give you the ability to add another report and set what you want to do with it. You can add as many reports as you want to a batch (within your licensing limits).
Job Edit Window (When Creating a "Normal" Batch)
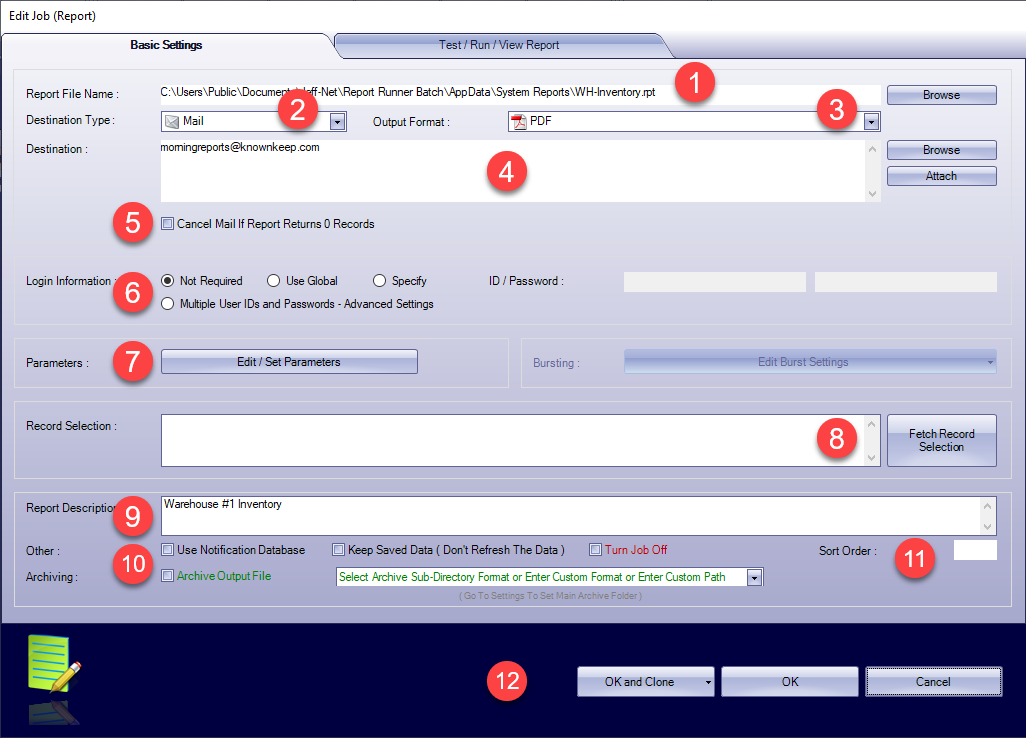
- Choose your report (.RPT) file template (default location is always the My Reports folder)
- Choose the Destination Type (file, mail -- with attachment, report as mail -- put rpt as HTML in mail body, FTP, Sharepoint, SMS, PDF Board)
- Choose Output Format (PDF, XLS, DOC, CSV, etc)
- Enter Destination (the file name, the email addresses, the FTP settings, etc)
- Choose to Cancel processing of export if report returns 0 records (there is also a Global Options setting to attach a message to Subject that report return 0 records instead of not sending email at all)
- Set the login type
- Click Edit/Set Parameters to set your parameters
- Override record selection in the report (this is left blank most of the time, but if you want to override the record selection, fetch it and change it to what you want)
- Describe your report attachment when listed in the email (optionally, this description can be used as the subject of your email in your batch-specific INI settings -- Subject=[Report Description])
- Select final options
- Enter a number to specify the batch job sort order (by default batches are automatically sorted by Destination Type)
- Buttons to exit window or clone the current job
Note: Test/Run/View Report tab and Edit Burst Settings will be covered later.
Destination Types

- Printer (send report output to a printer)
- Mail (email the report output as a file attachment)
- File (export to a file)
- Message via Mail (email the report output as the body of the report)
- FTP (upload the report to a server FTP location)
- Message via Twitter (deprecated and no longer supported)
- Sharepoint (export to self-hosted Sharepoint folder -- this is generally used with older versions of Sharepoint)
- Sharepoint Online (export to externally hosted Sharepoint location -- this is generally used for modern exports to Microsoft accounts)
- SMS (export the reports as text and send via SMS -- authorization is required for this feature, as well as an Enterprise or Infinity license)
- PDF Board (upload report files to your PDF Board account -- PDF Board is our own mobile application for the easy viewing of reports on phones and tablets -- find out more at pdfboard.com)
Output Formats
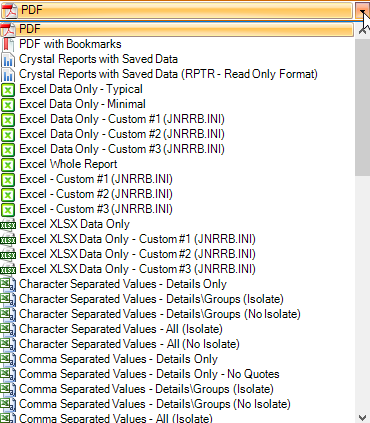
We support most any type of export file format (including random stuff like images and text-to-speech). Most of the formats are self-explanatory if you've exported anything before. If you see a "Custom" export, that means you can specify exact settings in the JNRRB.INI file for that export format. See this "Custom Export Formats" KB article for more information on that topic.
If you are doing a CSV export and you need to specify what characters "wrap" a field or "separate" the various fields, be sure and choose the Character Separated Values format and not the Comma Separated Values format (character allows you to specify everything, comma defaults to "comma" format). When you select Character Separated Values, this will be added to your job window:

Destination
The look of this field will completely change based on the destination type. For example, here is what it looks like with FTP, Sharepoint Online, and PDF Board selected.


Entering multiple email addresses?
For mail destinations where you have multiple email addresses, you have two options. You can enter them all one by one in a text file (.TXT) format and ATTACH it to the job. That way you can simply modify the text file anytime you need to make changes and you can re-use the text file with multiple jobs. Maybe you have a "managers.txt" file and a "morning reports.txt" file and a "salespeople.txt" file... you get the idea. The other option is to simply enter multiple emails manually. When you do, separate each email address with a semicolon, not a comma.
joe@reportrunner.com; sam@reportrunner.com; mary@reportrunner.com
Do you need to bundle emails (multiple attachments to multiple people)? As long as the email list is EXACTLY the same, bundling will happen automatically. See this KB article for additional information.
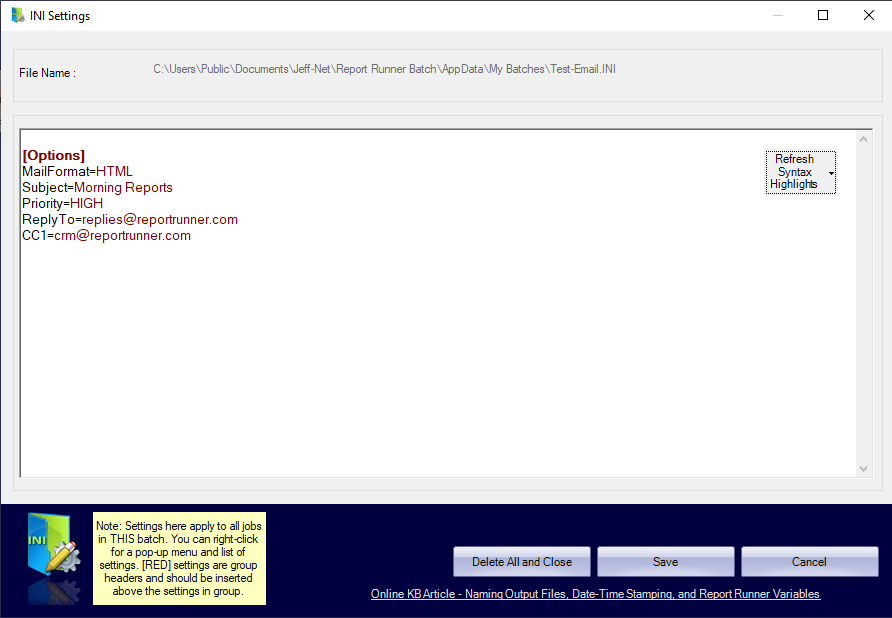
INI Settings
For example, if you enter some custom XLS/XLSX settings, and you have exports in your batch to both PDF files and XLS/XLSX files, those custom settings will only apply to the XLS/XLSX files... they will have no affect on the PDF files.
Another example, if you are doing multiple emails in the batch, and you make custom email settings in the INI file, well those email settings will be applied to every email (whether you intended that or not).
So, what kind of things can you do with the INI settings? Tons! There is a LOT of extra "power" in these INI settings. We make Report Runner Batch pretty easy to use "out-of-the-box", but for extra functionality, those are in the INI settings. Here is a random list of things you can do with the INI settings (but you can do much more):
- Customize emails (subject, priority, reply to, CC, BCC, etc)
- Merge multiple PDFs into one file
- Attach external PDFs to emails
- Password protect your PDFs
- Attach external files (any format) to emails
- Merge multiple XLS/XLSX files into one file (one file per tab)
- Run a SQL statement pre-batch or post-batch
- Enable date-time stamps on files
- Set how text files should be encoded
- Format newsletters
The list goes on and on.
All of these settings are available via your right-click mouse menu. The pop-up menu looks like this:
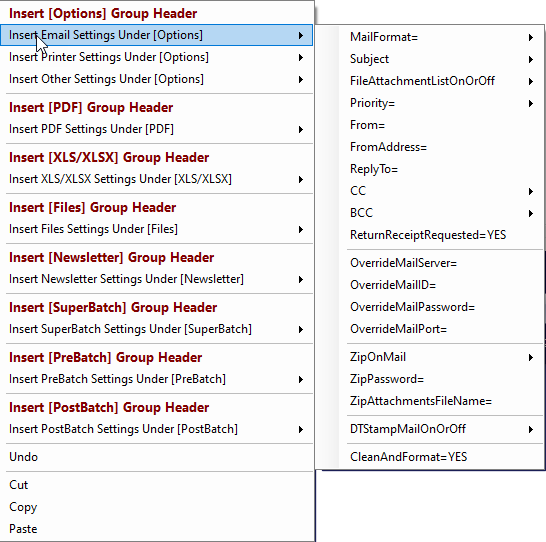
The INI file setting work like any INI file. You have a [Group Header] and then you have settings that go under that header. In the pop-up menu, anywhere you see the red group header, those settings MUST go under that specific group to be "seen" by Report Runner Batch.
Note: To make the settings easier to read/see, the syntax is highlighted different colors (see first INI screenshot). After entering various settings, you can click the Refresh Syntax Highlights button to re-color everything. This also happens automatically when you open your INI settings. Oh... and if you hit the down-arrow on that button, you can choose some alternate color options!
Mail Header
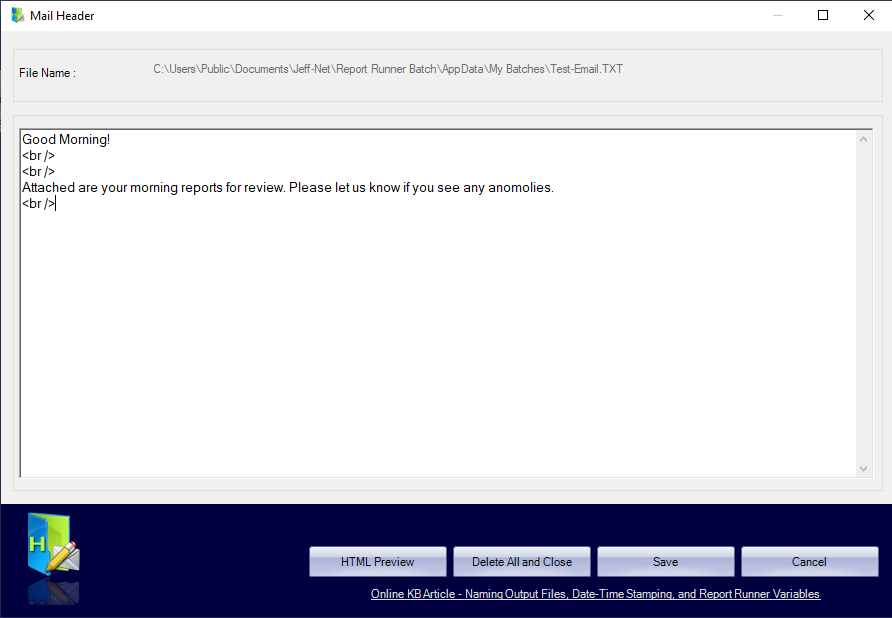
Report Runner Batch can insert a custom header into your email(s). You configure that by clicking the Mail Header button. The header can be formatted as plain text or HTML (the default is plain text). If you use HTML, you must set the batch-specific INI option of MailFormat=HTML for it to be interpreted correctly.
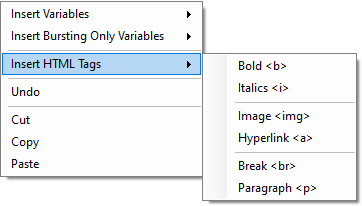
If you do enter HTML, there is a right-click pop-up menu available to help you with the syntax and variables.
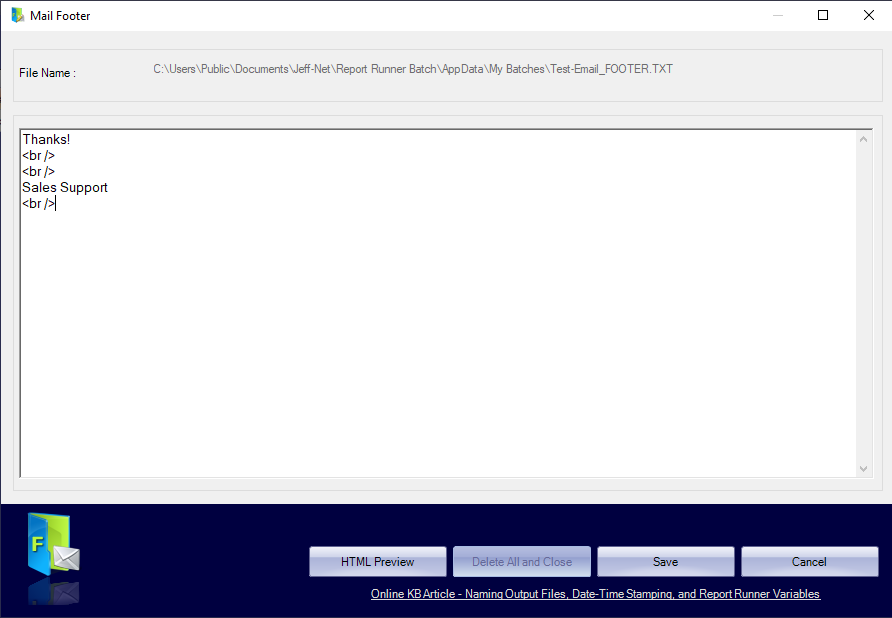
Report Runner Batch can also append a custom footer into your email(s). You configure that by clicking the Mail Footer button. The footer can be formatted as plain text or HTML. The format must match whatever you've done in the header.
Just like the header, there is a right-click pop-up menu available to help you with HTML syntax and variables.
Tip: We have a popular KB article which goes over using our "jn" variables in headers, footers, and elsewhere. It also gives additional examples on formatting the mail subject in the INI settings.
Scheduler
Our Batch Scheduler is an interface, to schedule reports in the Windows Task Scheduler, without needing to use the Windows Task Scheduler to do it.
In other words, when you "schedule" a batch in the Report Runner Batch Scheduler interface, where it is really scheduled, is in the Windows Task Scheduler. We did not create our own scheduler; we use the Windows Task Scheduler (created and maintained by Microsoft with the Windows operating system). Creating a scheduling service is SUPER complicated and not recommended (we hear a number of horror stories of missed schedules from customers who tried a competitor's product before coming to Report Runner).
Note: If you open the Batch Scheduler with no batch XML file opened, you will see ALL schedules.
Note: If you open a batch XML file and open the Batch Scheduler, you will ONLY see schedules related to that specific batch.
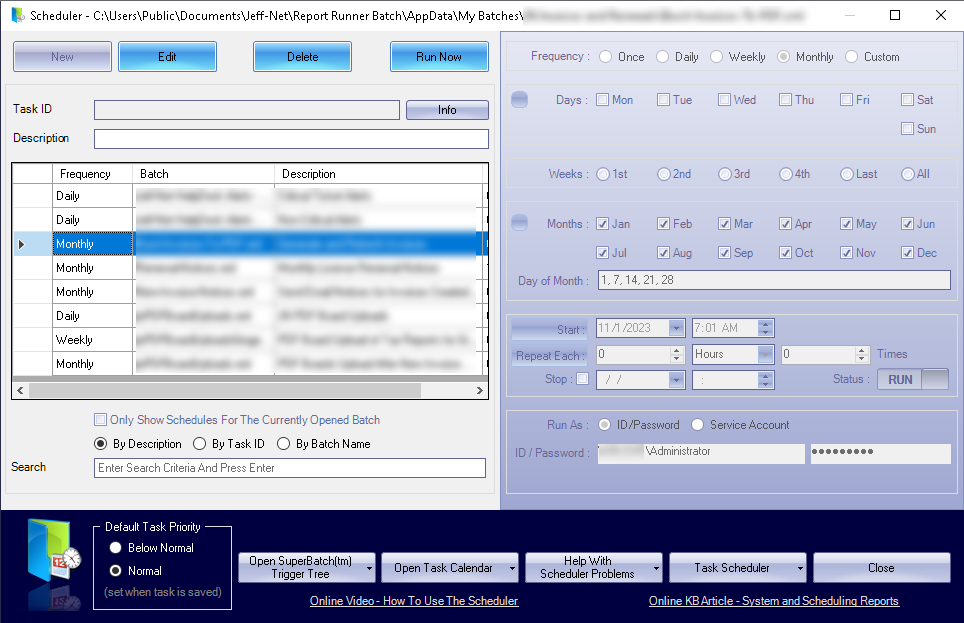
Creating or Editing a Schedule
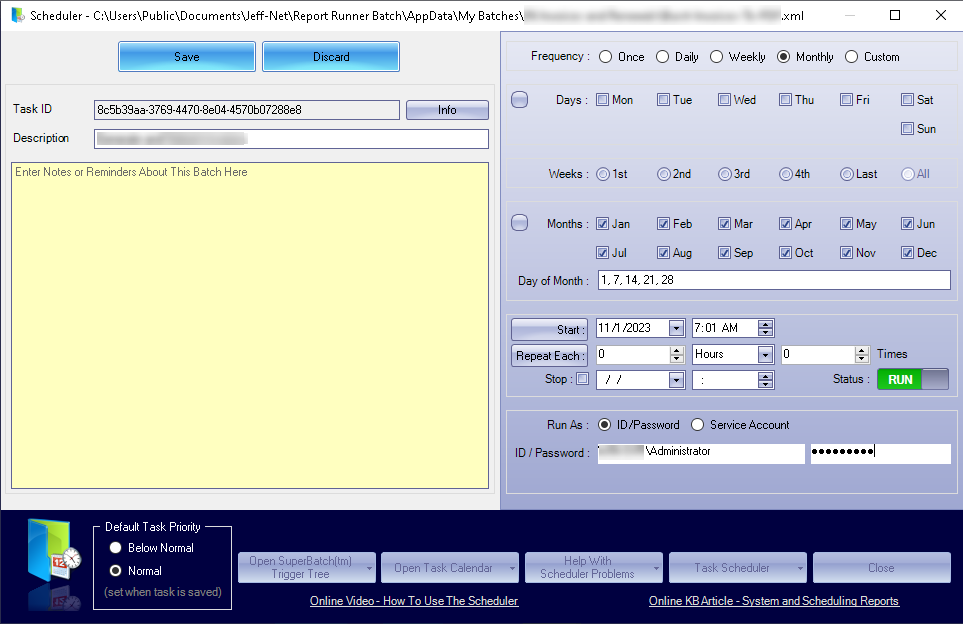
The basics of scheduling a batch are pretty straightforward:
- Enter a short description for yourself so you can quickly know what it does.
- Optionally enter any notes or reminders about how or why you scheduled the batch this way.
- Choose your frequency (this will alter some of the options based on what you select).
- Choose specific day names, weeks, and/or months. For monthly, you can enter specific days in a month (you can use "L" as a special keyword for "last day of the month"). Multiple days should be separated with a comma.
- Set a start date, whether it repeats any once started, and stop date (normally you will uncheck stop date to make it "forever").
- The RUN button is a green when turned on, and it is red when switched OFF. If you change a previously scheduled batch to OFF (and save the schedule), it will delete the scheduled task in the Windows Task Scheduler.
- Lastly, enter the Windows credentials (not database credentials) to run the task. An actual Windows ID is preferable over using the SYSTEM service account. In general, the SYSTEM account does not have access to all resources, but it is easier to use, because it doesn't require a password.
Tip: We recommend creating a "generic" Windows ID (an ID like "reportrunner") for scheduling your batches, where the credentials do NOT expire. This will make scheduling much easier and dependable for you. If you use a "normal" Windows ID and make mass security changes or the user that owns that ID leaves the company, your schedules may (will) fail in the future.
Holidays and "Do Not Run" Dates
Report Runner Batch has a way to create "do not run" dates (which may include holidays). You do this by creating your own list of dates (calendar) in the JNRRB.INI file. You name the "calendar" and then in your batch-specific INI settings, you specify DoNotRunCalendar=<this calendar>.
Note: jnMaster is a special "do not run" calendar that is ALWAYS checked for ALL batches. By default, it does not have any values (it is blank).
Here is what it might look like in your JNRRB.INI file:
[Calendars]
'These calendars are used to NOT run a batch on a given date
'Format is MMDD (two character month and day for each required) - For example: 1225 is December 25th/Christmas
'Separate multiple dates with a comma - For example: 1225, 0214, 0101

'jnMaster is a SPECIAL calendar name. It is checked AUTOMATICALLY for ALL batches and will NOT run the batch if same date
jnMaster=

'This is checked only if you MANUALLY set "DoNotRunCalendar=<this calendar>" within your batch-specific settings/INI
Holidays=0101, 0214, 1225
MyDoNotRunCalendar=
MyWhateverCalendar=
MakeUpYourOwnCalendar=
Note: These special calendars are not "visible" in the Scheduler. The Scheduler will still show a batch "scheduled" to run on a certain day, but rest assured, if you have a "do not run" calendar set for the batch, the batch will start and exit successfully with a calendar message (and no reports processed or actions will be taken). All of that to say the schedule still "runs", but the batch does not.
Helpful Tips on Start Dates and Repeating
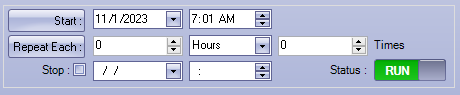
If you look closely at the screenshot above, you'll notice the Start and Repeat Each field labels are actually buttons. Why use buttons? Because you can click them to get extra help in configuring that field with the Scheduler Assistant.
If you click the Start button, it will make a "guess" at what you want the start date to be. For example, if it's Thursday and you want to schedule a batch to run every Monday, it will guess that you want to start next Monday. Another example, if you're scheduling a monthly batch that should run on the first, and it's March 15th, it will guess that you want to start this schedule beginning April 1st.
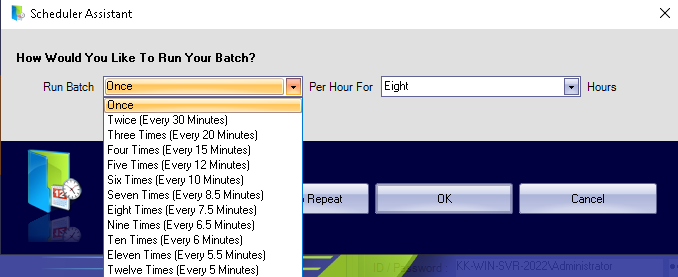
The repeat field can be a little confusing calculating various values. If you click the Repeat Each button, it will display a window like the one below:
Additional Scheduler Features

In the bottom blue area of the Scheduler are additional buttons/options and links to common KB articles related to scheduling.
Note: The Default Task Priority section is for setting the priority used when creating and editing scheduled tasks during this session. In almost every case, you want to set the priority to Normal. If you set it to Below Normal, the task will allow most any other process to run first. This can cause something that runs in 5 minutes to take 5 hours to complete. If it really doesn't matter or you want to run a schedule at a lower priority, we make it available. Just pay attention and remember if you change it, because the setting is retained after you close the Scheduler window.
Now, let's take a look at the rest of the buttons...
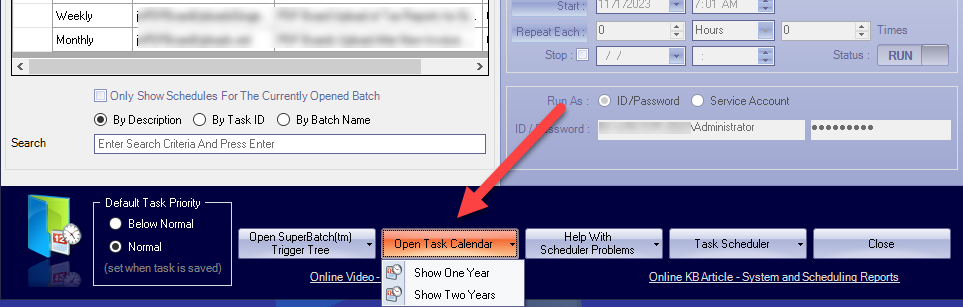
Open Task Calendar Button
When you click the Open Task Calendar button, there is a drop-down menu to choose between a one and two year view.
This is an example of the "one year" schedule for the schedule above.
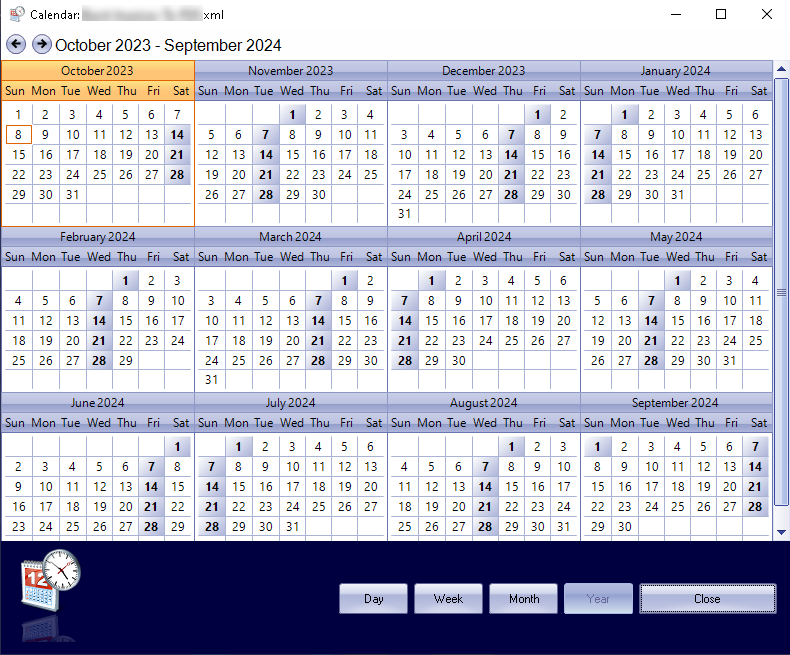
You can switch between Year, Month, Week, and Day view within the calendar (to zoom in and out). This is what the Month view looks like.
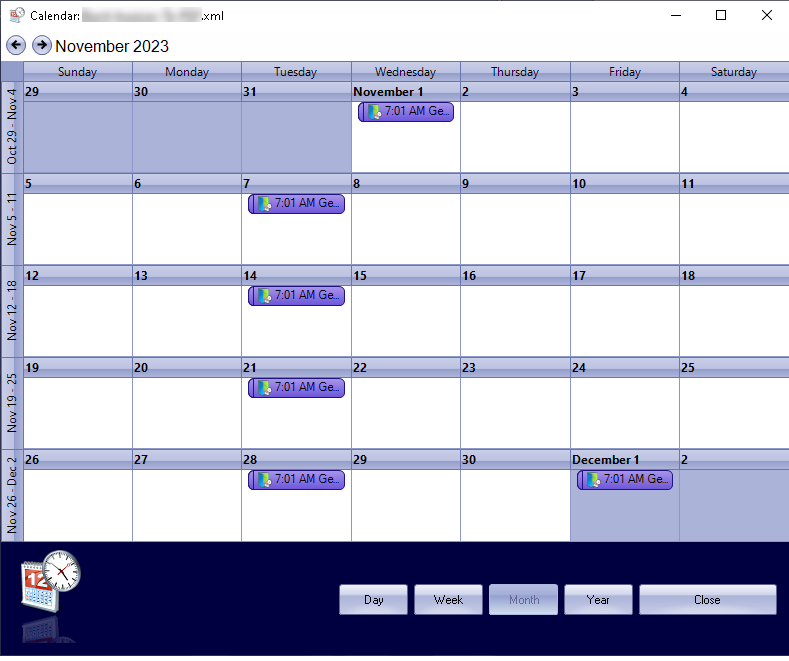
Note: These calendar views are very important. They are more than just a "pretty" view of your schedule. It's a means of "double verifying" your schedule is doing what you expect. How? Because we're not just "guessing" or displaying your run dates from what you entered above. What you SEE in the calendar is EXACTLY what the Windows Task Scheduler has provided us as the SPECIFIC dates and times this schedule will run.
Task Scheduler Button
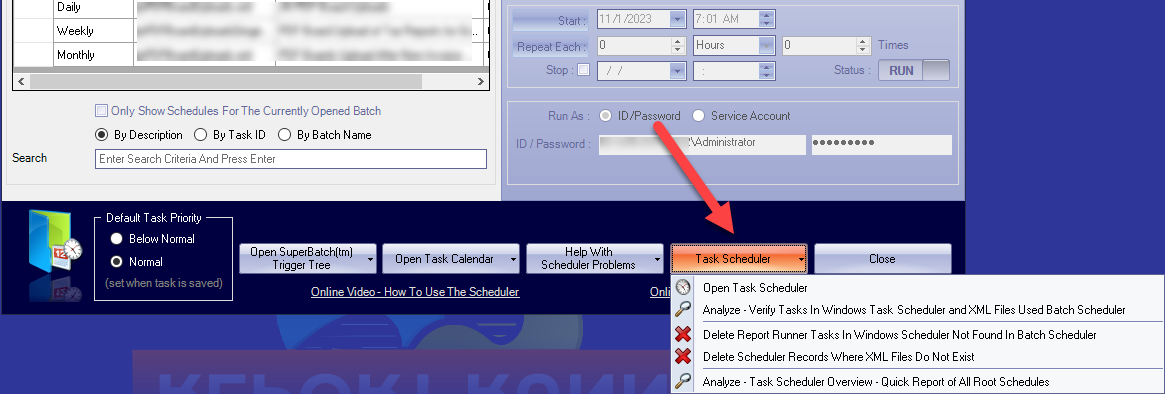
When you click the Task Scheduler button, you'll see the following five sub-menu options:
- Open Task Scheduler - Opens the Windows Task Scheduler.
- Analyze - Verify Tasks... - This generates two text-based reports to show you what's out-of-sync between the Batch Scheduler interface and the Windows Task Scheduler records.
- Delete Report Runner Tasks... - This automatically deletes/cleans up an Report Runner Batch tasks found in the Windows Task Scheduler that are NOT found in the Batch Scheduler interface. (this can happen if you rename or delete a Batch XML file and then do the clean-up feature below).
- Delete Scheduler Records... - This automatically deletes/cleans up any Batch Scheduler records where the batch XML file can not be found (this can happen when you delete or rename a Batch XML file).
- Analyze - Task Scheduler Overview - This generates a quick report to see ALL root schedules in the Windows Task Scheduler (this can be helpful to find a task that's running that shouldn't be or a task that you thought was scheduled, but isn't).
Did you know we have system reports to show you upcoming runs/schedules of your batches (that can be scheduled in Report Runner Batch and emailed to you daily or weekly)? See this KB article for more information.
Windows Task Scheduler
You do not normally need to work with the Windows Task Scheduler, but just in case you do, here is a quick overview.
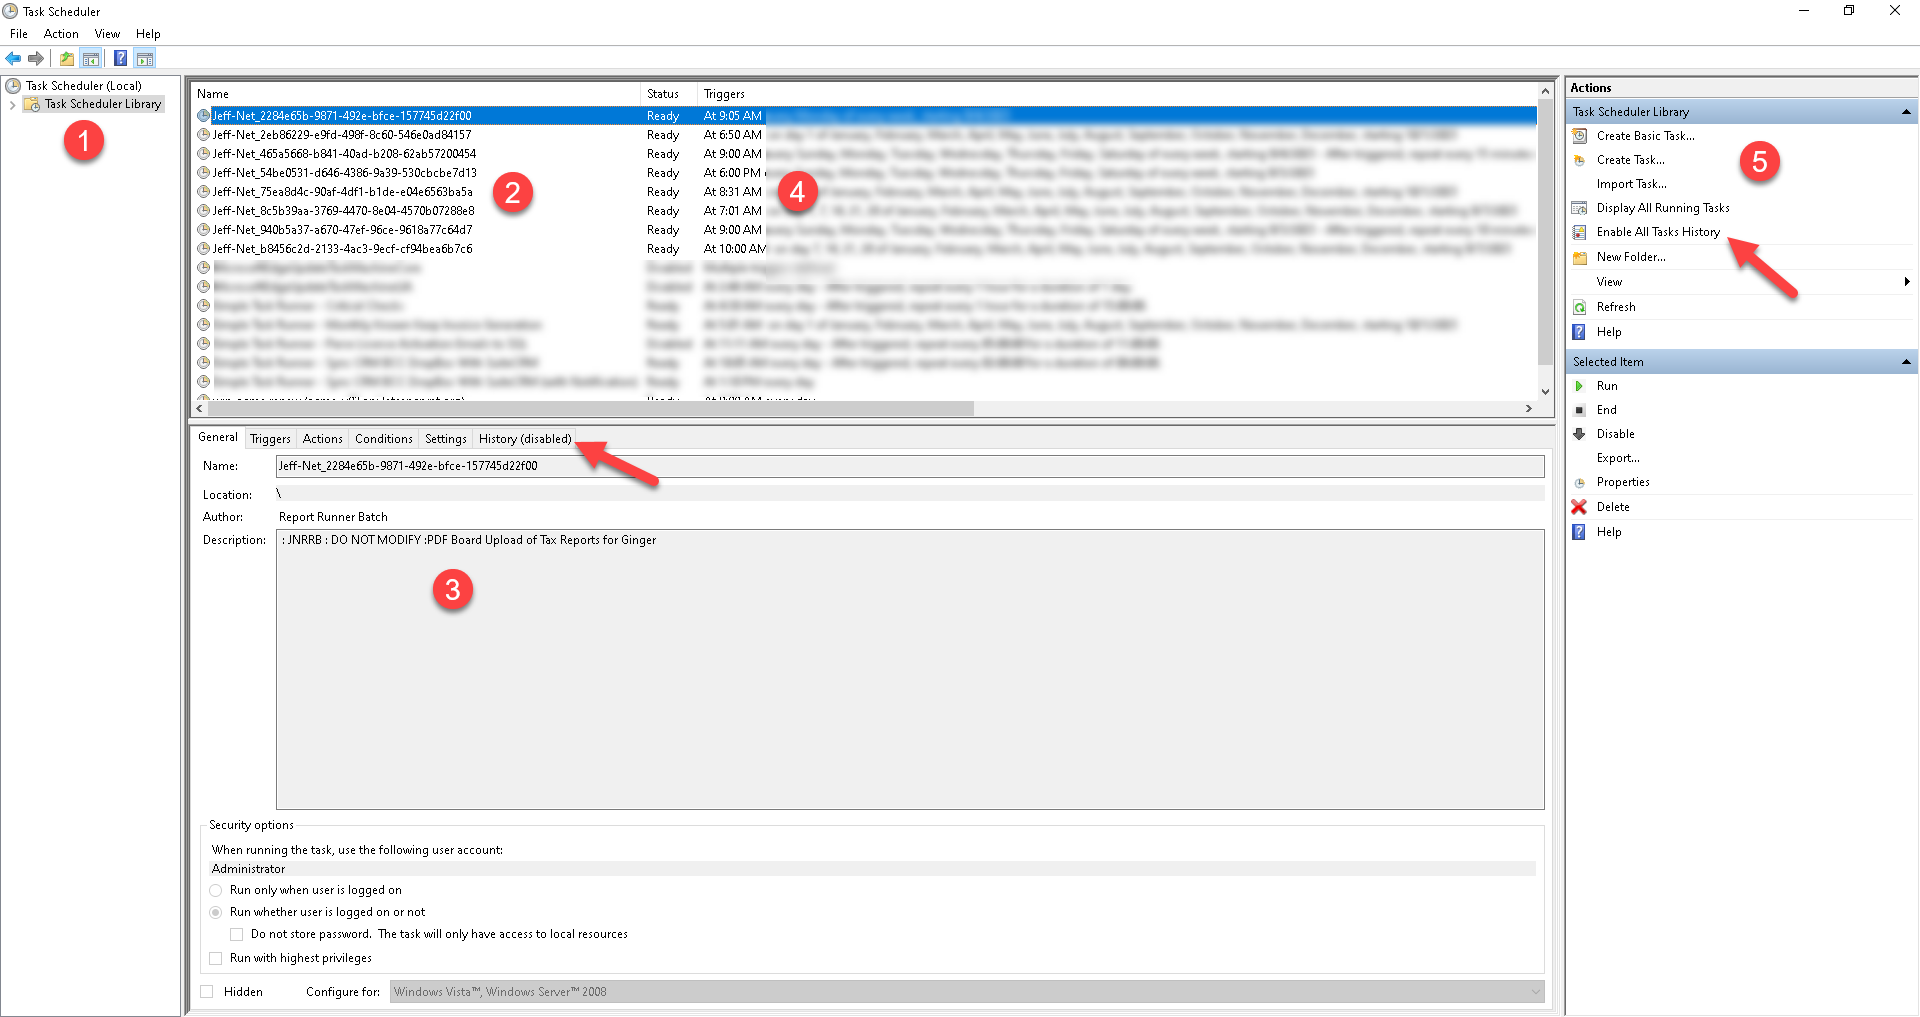
- Be sure and click on Task Scheduler Library. Otherwise you won't see the scheduled tasks.
- Task names or for Report Runner tasks, the task ID.
- When you select a task, you can see other properties down in this area. This area is tabbed, so the information is separated by triggers (what makes it run), actions (what is it running), conditions (anything to make it run or prevent it from running), etc.
- Additional task information (you can scroll to the right to see more information). This will also show the last result of the run and error information.
- Additional Windows Task Scheduler settings
Tip: Notice the arrows in the screenshot above. If History is shown to be disabled like that, be sure and click on Enable All Tasks History. Otherwise, you can only see the last run. With History enabled, it will keep up with much more information which may be useful in determining why a task was missed (didn't run).
Additional Scheduling Knowledge Base Articles:
- Scheduled Reports Won't Run --- What's The Problem?
- What permissions are needed for the Report Runner Batch User when scheduling a task?
- Error 0x80070005 (E_ACCESSDENIED) Trying to Add/Create/Save a New Task Schedule to Windows Task Scheduler
- Windows Task Scheduler Fails With Error Code 2147943785
Global Options/Settings
These settings are "always on". They are "global" to all of Report Runner Batch. Some of the settings, like date-time stamps and email settings, you can modify for a given batch (with that batch-specific INI settings).
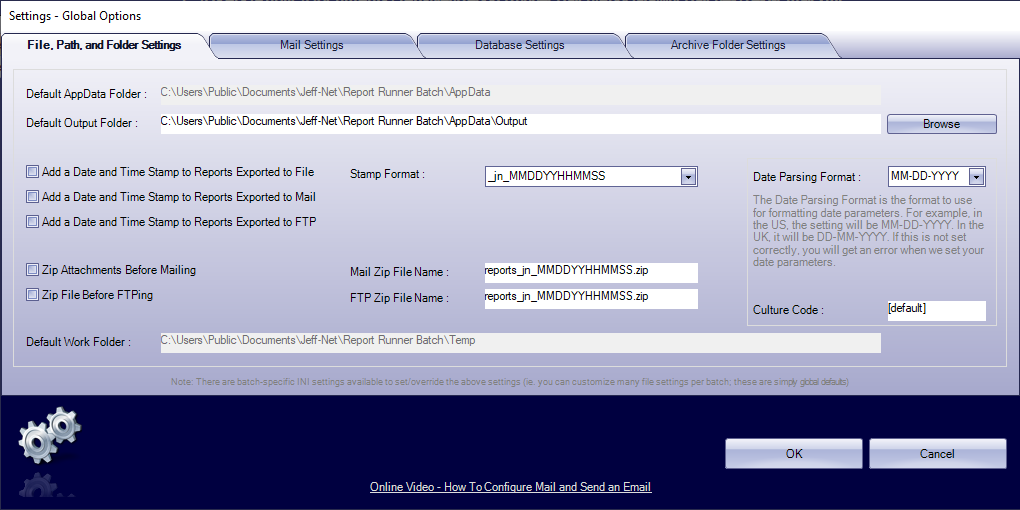
The first tab is the File, Path, and Folder Settings:
The second tab is the Mail Settings:

We offer pretty much any kind of email configuration you need. We offer both SMTP email and token/OAuth-based email. We offer "canned" settings for both Office 365 and Gmail (the two most common providers).
We recommend, if at all possible, to use SMTP authentication. The reason being is that token/OAuth type authentication can be a bit flakey. There are a number of things that can invalidate a token, and once it's been invalidated, you will not be able to send email until another token is authorized. We support it, but it's much more complicated than "simple" SMTP authentication with an ID and password. Microsoft/Office 365 now provides a way to set an application specific password, so you can configure a "permanent" password just for Report Runner.
Interested in setting up a Send Mail token using Microsoft MSAL/Graph? See this KB article:
If you have never configured email before, you'll want to get with your in-house email or network administrator to do this for you.
The third tab is the Database Settings. This is where you can specify your "global" ID and password.
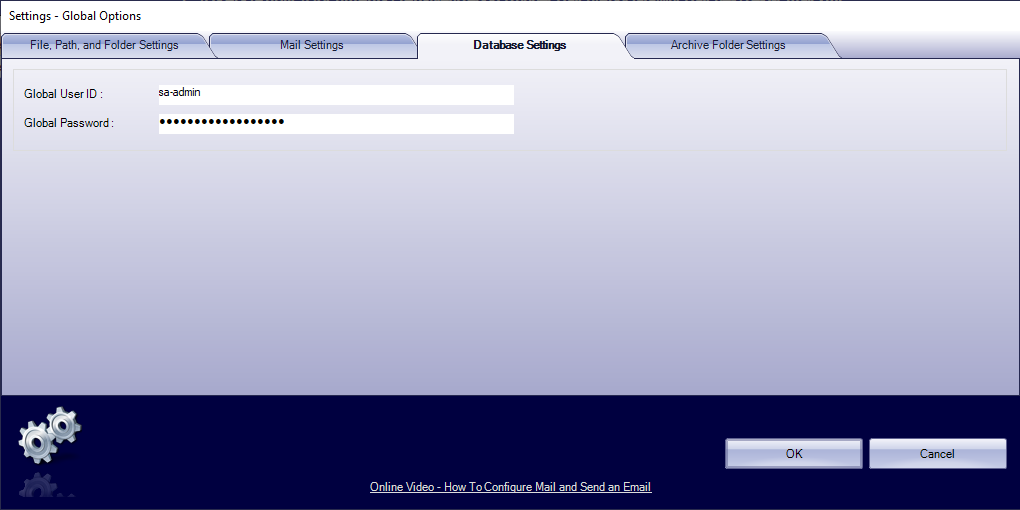
The global ID and password can be used/selected in the job edit window. If you do this and later the ID and/or password changes, you only need to update it (once) in your Global Settings... you do not need to go back to every job and change it.

The last tab is the Archive Folder Settings:
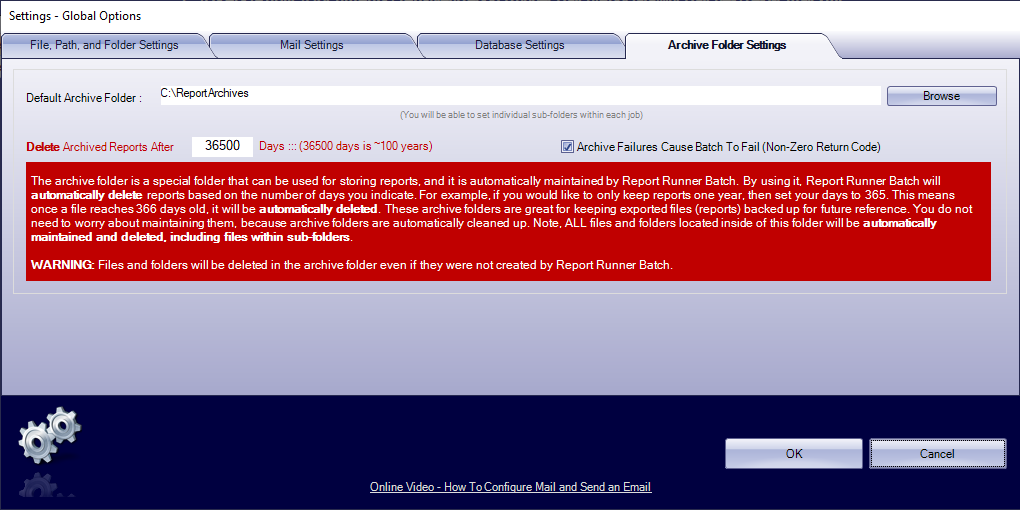
Here you can set your "master" archive folder. Once a folder is determined, you have two other settings to review.
- When to auto-delete archived reports... you enter the number of days old the archive should be to be deleted. By default, we set it to 36,500 days which is 100 years.
- The other checkbox setting is whether a batch should fail if there's any kind of archive failure. In general, archives do not fail, but we allow modifications to the archive folder in the job edit window, and mistakes can be made there.
These archive settings are (optionally) used in the job edit window:

For any job you want to archive the output on, just check the Archive Output File box. You can use the root default folder, you can enter your own custom sub-folder, or you can choose one of the pre-defined date-based sub-folders:
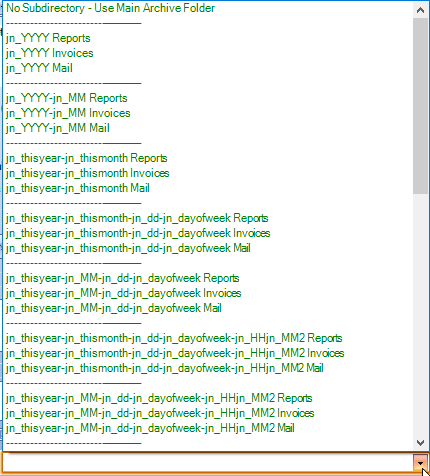
Note: If the Archive option is greyed out (disabled), it's because you're not doing any kind of file output. The archive only makes a copy of what you're doing when there's a file it can copy and archive.
2.2 TOOLS VIEW

- Global Constants - Set/configure STATIC variables which can be assigned to parameters
- Global Expressions - Set/configure non-STATIC variables which calculate values at runtime to be assigned to parameters (single line VBScript or SQL Select statements supported)
- Global Pre/Post Batch SQL - Set/configure SQL statements that run either pre-batch or post-batch (these are usually UPDATE statements or calls to stored procedures)
- Generate - Generate command lines to call a batch XML file or short-cuts on the desktop
- Save As - This is what you use to save an existing batch as another batch file name (it will also copy the matching INI, header, and footer files)
- Find / Replace - Global find and replace utility (most commonly used to, for example, update an old email address to a new email address)
- Discover - This is a global find and lookup of everything in your batches (for example, find all batches which use whatever.rpt file or whateveremail@company.com)
- Launch - Initiate/open another copy of Report Runner Batch (most commonly used to edit another batch/XML file)
- Mail Event Rules - If you have an Event Server license, this is where you can edit your Mail Event Rules
- File Event Rules - If you have an Event Server license, this is where you can edit your File Event Rules
- SQL Event Rules - If you have an Event Server license, this is where you can edit your SQL Event Rules
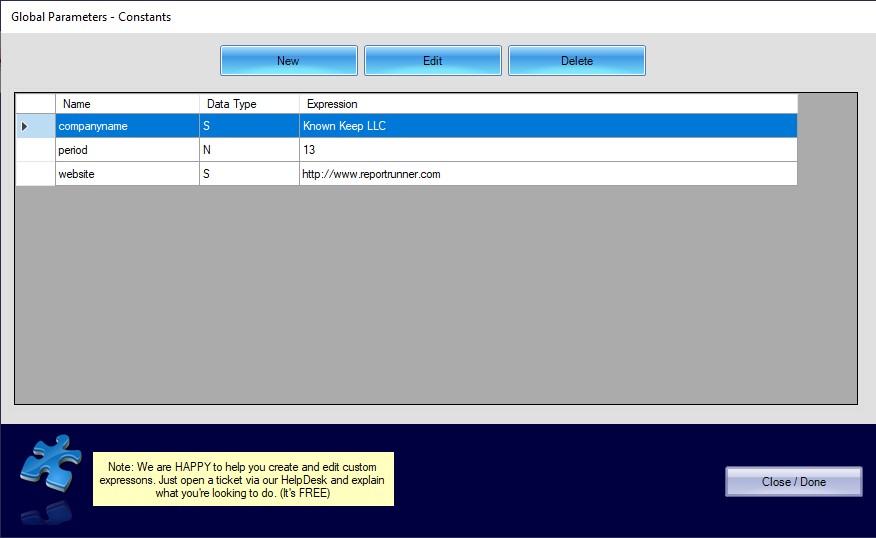
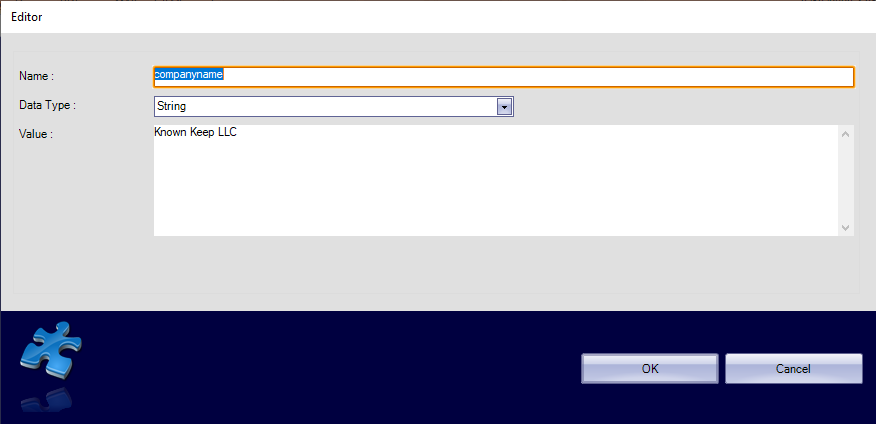
Global Constants
Create an unlimited number of STATIC variables to assign to report parameter prompts/values.
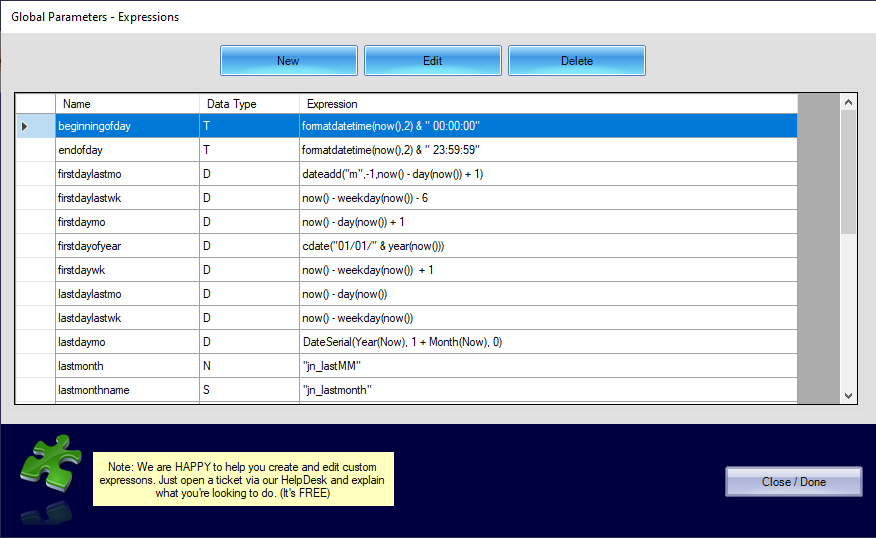
Global Expressions
Create an unlimited number of non-STATIC "calculated) variables to assign to report parameter prompts/values. You can use single line (flat) VBScript type scripting or SQL to calculate and/or select a value from a SQL database. Report Runner Batch ships with a number of pre-defined expressions, but you can modify them or add your own.
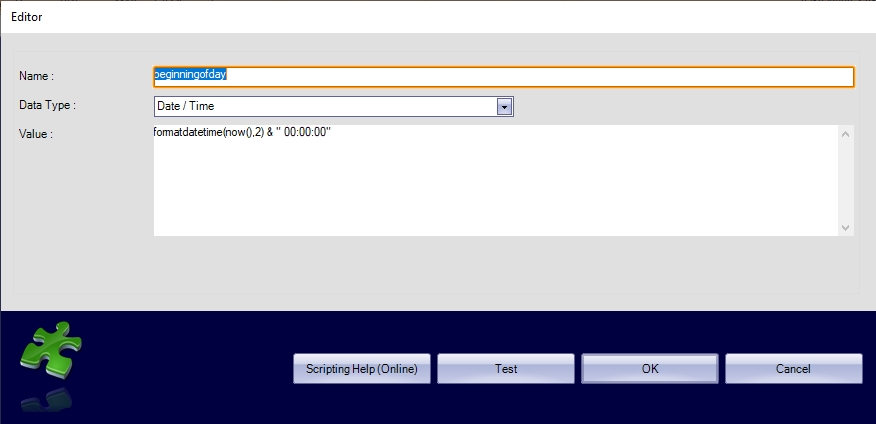
An example of a date/time expression:
An example of a SQL-based expression which uses a Select statement to get an accounting date:

An example of a SQL-based expression which was created to feed what we call a Parameter Burst. In this example, the Select statement is created to fetch MULTIPLE invoice IDs to pass in sequential order to a parameter value (to do a parameter burst):
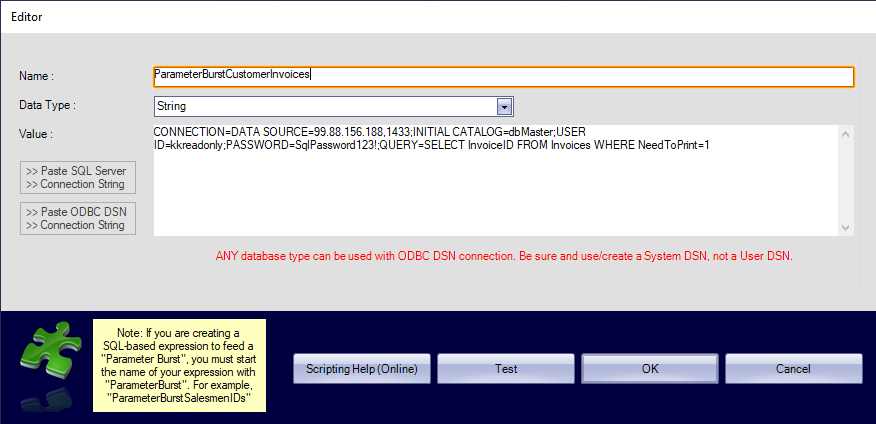
Note: When creating a SQL-based expression for a parameter burst, the NAME of the expression should START with the words "ParameterBurst" (no spaces). This is a keyword so these expressions will show in the drop-down box for parameter-burst-based batches.
If you require any assistance with creating expressions, just reach out to Support via the help desk, and we are happy to help you create any expression your require. It's FREE!
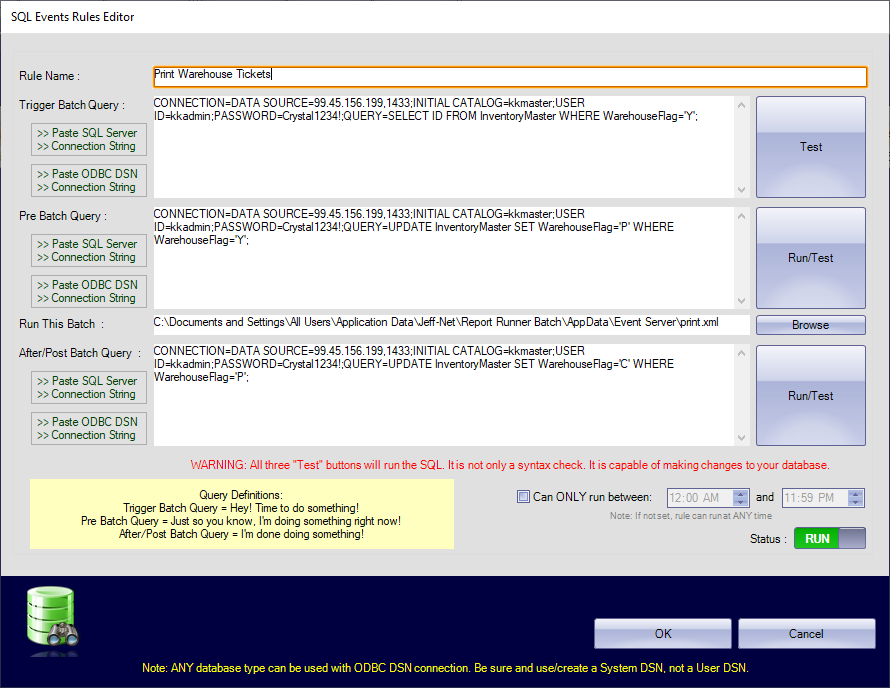
Pre/Post Batch SQL
These SQL statements can be run before (pre) a batch or after (post) a batch. You configure them here in the Tools menu. You select them and configure them to be run in the batch-specific INI settings in the [PreBatch] or [PostBatch] groups. For the [PostBatch] groups, you can choose the condition to run the SQL (good vs bad batch run -- if both, configure it for each).
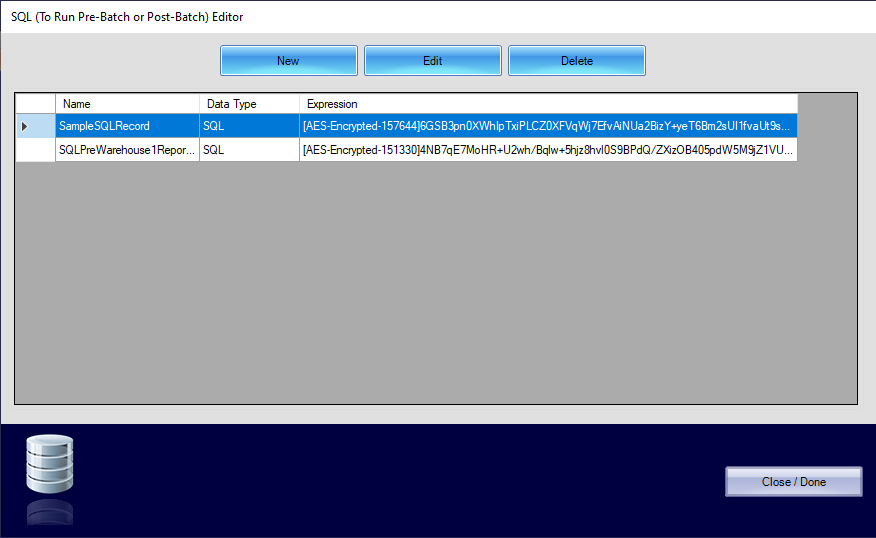
Since SQL connection strings require the usage/entering of an ID and password, this sensitive data is encrypted with the AES-256 technology. It is NEVER visible in "plain text", except when you're editing it.
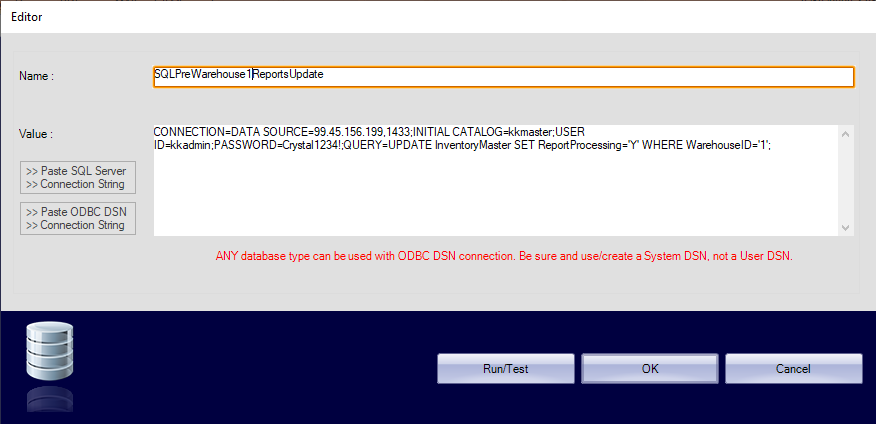
An example of a pre-batch SQL UPDATE statement where a ReportProcessing field (flag) is set to "Y" for Warehouse ID #1:
 .
.
Tip: As mentioned in red on the screenshot above, if you're using a DSN in your connection string, ALWAYS create System DSNs and not User DSNs. The System DSN will be available to any Windows ID you use to schedule or run a batch.
Generate
Use the following menu options to generate a command line (the executable and XML file name for the currently opened batch) or to generate a short-cut on the desktop that can be double-clicked to run later.
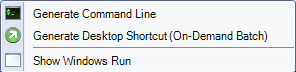
Warning: The desktop short-cut, when double-clicked, will run the batch IMMEDIATELY. There is no extra prompt or "warning". The short-cut is for running the batch on-demand. For example, if you wanted to randomly print all open order pick lists for a warehouse every so often.
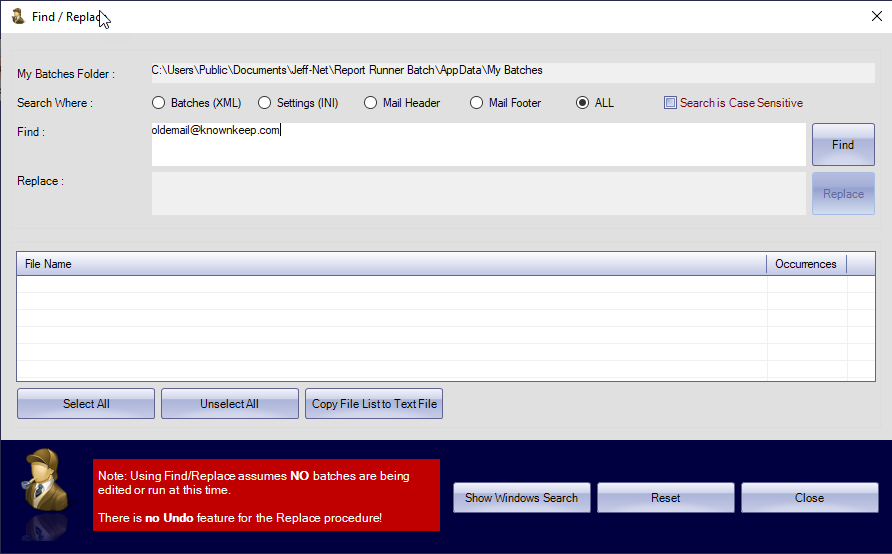
Find / Replace
The find and replace utility can be used to search a folder recursively (including any sub-folders and files) and replace found values with another value. It's multi-step (you find first, it will list files where found, you can manually edit if you wish, or enter a replacement value and click Replace button).
Warning: There is not an UNDO function for the find/replace utility. Be careful using this utility.
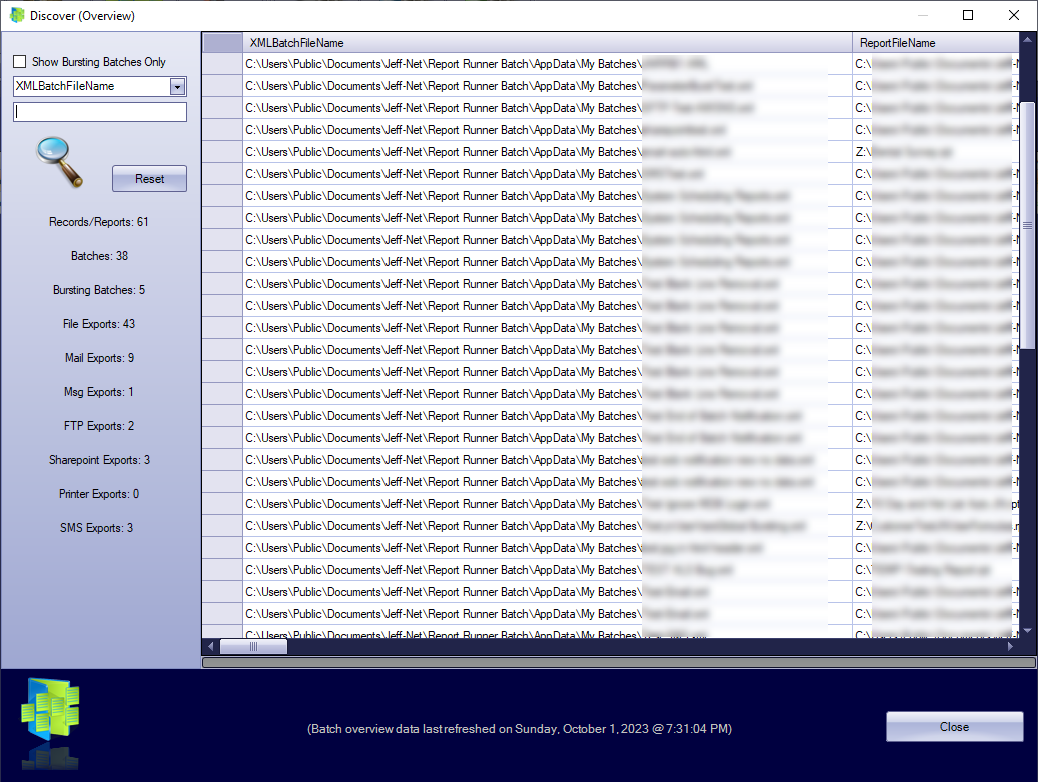
Discover
This utility show quick stats along the left side of the window. You can choose a search field from the drop-down and filter the results. Once you have the end results, you can right-click on the list and export the results!
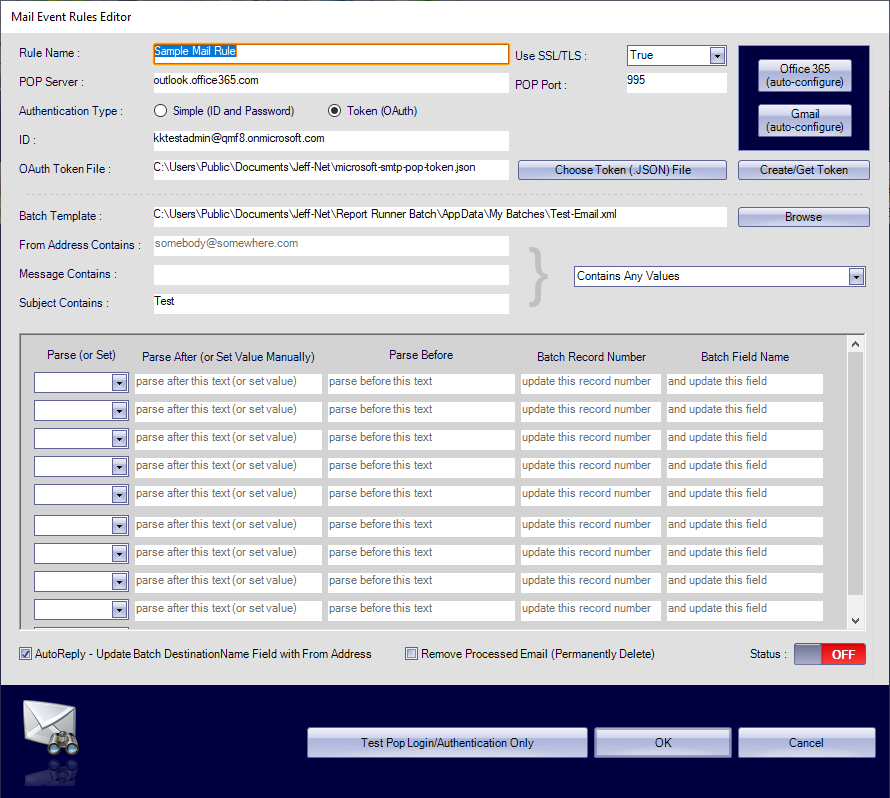
Mail Event Rules (for Event Server)
This is the editor for configuring mail rules for Event Server. This will be discussed further in the Event Server manual.
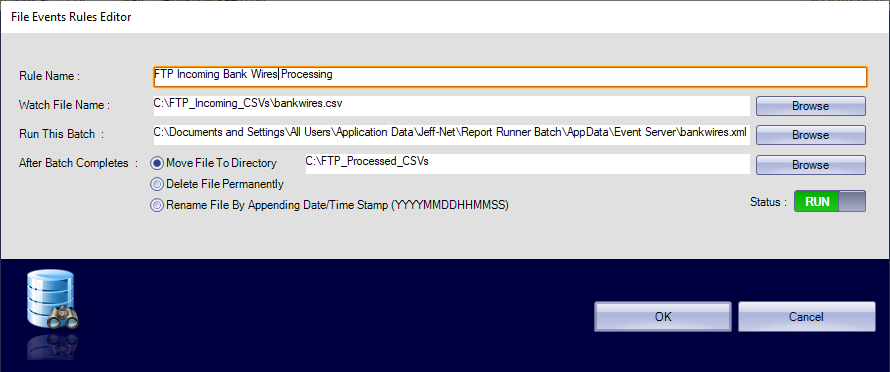
File Event Rules (for Event Server)
This is the editor for configuring file rules for Event Server. This will be discussed further in the Event Server manual.
SQL Event Rules (for Event Server)
This is the editor for configuring SQL rules for Event Server. This will be discussed further in the Event Server manual.
2.3 HELP VIEW
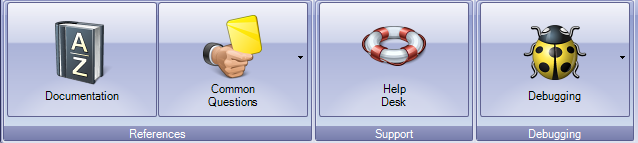
Documentation
This option brings you to THIS online manual.
Common Questions
Quick access to online KB articles most commonly asked to Support.
Help Desk
Opens your default browser to our Help Desk (located at https://help.reportrunner.com/).
Debugging
This option displays the following drop-down menu:
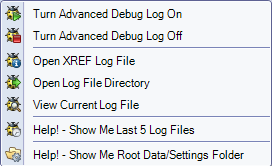
Here you can:
- Turn debugging on and off (we recommend keeping it on as the logging ultimately has a meaningless affect on run times)
- Open XREF Log File - This opens the MONTHLY log file which is a cross-reference of each report run and the log file that goes with it.
- Open Log File Directory - This opens Windows Explorer to the log file directory where you can see all log files generated for the last 30 days (Report Runner automatically deletes/maintains the log file directories)
- View Current Log File - This opens the log file for the current Report Runner session. If you're having any issues running a report, you'll want to send THIS CURRENT LOG FILE to Support if you open a Help Desk ticket.
- Help! - Show Me Last 5 Log Files - This automatically opens the last 5, most recent, log files. This is a "last resort" option we created for users who are overwhelmed looking at all the logs and do not understand the Windows Explorer interface.
- Help! - Show Me Root Data/Settings Folder - This opens Windows Explorer to the top starting (root) directory of the Report Runner data files location. This is different than where the application is installed in the Program Files directory.
2.4 ABOUT/LICENSING VIEW
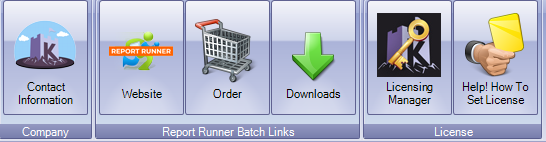
All-but-one (Licensing Manager) of the above buttons will open your default web browser to a location on our site, reportrunner.com.
- Contact Information - opens to our contact page (addresses and ways to reach us)
- Website - opens to reportrunner.com
- Order - opens to shop.reportrunner.com for Batch licensing
- Downloads - opens to our downloads page
- Licensing Manager - this is where you can see, activate, and deactivate licensing
- Help! How To Set Licensing - opens the KB article for how to set licensing and USE the Licensing Manager. We are not duplicating the Licensing Manager documentation here, because it is documented in the KB article (https://help.reportrunner.com/knowledgebase/article/how-to-set-apply-or-update-your-license-and-licensing)
Reminder: Looking for documentation on how to use the Licensing Manager? See the KB article we just posted above (https://help.reportrunner.com/knowledgebase/article/how-to-set-apply-or-update-your-license-and-licensing)